A UGC video maker can help you edit a creator’s recording, produce a presenter video from a script, or generate a missing scene. Start with the material your campaign needs—whether you are comparing tools or learning how to make a UGC video from scratch—then check how the workflow lets you review, revise, and finish the cut.
ChatCut supports all three workflows in one timeline editor: editing recorded creator footage, generating supporting scenes, and creating presenter videos with AI Avatars. This guide compares the inputs and verification steps for each path, then walks through a seven-step production sequence from brief to exported variants using current product documentation.
Start with the video you need
Before choosing a tool, write down the deliverable: the core message, intended audience, placement, aspect ratio, language, and the footage, product photos, or script already on hand. Commercial user-generated content spans several distinct formats—direct-to-camera reviews, handheld product demonstrations, tabletop unboxings, and close-up detail B-roll (Nextify)—and each format relies on different source material and review checks.
Separate genuine customer endorsements from scripted presenter ads before writing a word. Under the US FTC Endorsement Guides (16 CFR Part 255), an endorsement must reflect the honest opinions or experience of the endorser, and material connections between a creator and a brand require clear disclosure. A recorded customer interview, a scripted avatar presentation, and a generated product shot do different jobs; never frame an AI avatar or a scripted actor as an independent customer review.
Compare the complete job rather than a single generation step. Include brief preparation, filming or generation attempts, timeline assembly, stakeholder approvals, and final export when you assess a workflow’s cost. A monthly subscription price alone cannot establish the cost of an approved ad. Check the current plan, available features, credit estimate, and export settings in the product you intend to use.
Picking a tool: the three paths “UGC video maker” actually means in 2026
Path A: an avatar presenter reading a script. Choose a supplied presenter or an authorized personal avatar, attach a voice, and provide the final script. Dedicated avatar tools typically sequence avatar selection, hook entry, preview, and download (SendShort). In ChatCut, AI Avatars includes official avatars and My Avatars. Selecting an avatar attaches it to the AI draft without starting generation immediately. Review the confirmation and credit estimate before allowing generation, then inspect the finished presenter clip in My Assets before placing it on the timeline.
Path B: a generated scene or supporting shot. Describe the scene and add the references required by the selected model. ChatCut’s AI Video Generation guide covers text prompts, reference images, first and last frames, and supported source-video operations across models including Seedance 2.5, Seedance 2.0, Gemini Omni, MiniMax H3, and Kling 3.0 and 4.0. Choose the model and inputs that match the shot you need. Generated footage can supply contextual B-roll or a visual opener within a larger edit, while recorded footage carries the physical product proof.
Path C: footage a creator actually recorded. Import the camera takes, find the strongest spoken passages, arrange the clips, and add captions or supporting product shots. Some ad platforms begin with creator footage featuring the physical product and then spin out script or language variations (Influee). ChatCut combines an AI video editor, transcript editing, and a multi-track timeline so you can cut from the spoken words, review proposed edits in context, and keep every track editable by hand.
One project can combine all three paths. You might keep a founder’s or creator’s recorded product demonstration, add a generated contextual shot where location filming was impractical, and produce a separate avatar-led opening hook to test against the recorded intro. Treat each version as an editorial choice that needs its own review.

Compare the inputs and the handoff
| Workflow | What you prepare | What you review | How it enters the edit |
|---|---|---|---|
| Avatar presenter | Selected avatar, final script or speech audio, voice and framing instructions | Spoken words, pronunciation, delivery, face, framing, and background | The generated presenter video appears in My Assets to place on the timeline |
| Generated scene | Shot description and the references supported by the selected model | Subject, product details, continuity, motion, and unwanted additions | Review the generated asset in My Assets, then drag the chosen take to the timeline |
| Recorded creator footage | Original video and audio, required message, and target aspect ratio | Cuts, speaker meaning, pacing, audio levels, captions, and crop | Imported footage stays linked to the transcript and multi-track timeline |
When comparing editors or AI UGC video generators, test a representative brief against the same delivery requirements. Check whether you can revise individual cuts after generation, control where B-roll and captions land, and export the exact resolution and aspect ratio your placement requires. An editable timeline that survives stakeholder revisions is more informative than an unverified vendor promise about speed, conversion lift, or cost savings.
Review the source, presenter and final export
Keep the original recording, approved script, and product reference photos organized with the project. Use only portraits and voices you own or have explicit permission to use. ChatCut’s avatar creation instructions and voice-cloning instructions require separate permission confirmations—even when the portrait and voice belong to the same person, likeness rights and voice-cloning rights are confirmed in their respective flows.
Review each generated asset in full before adding it to the cut. Inspect faces, hands, product geometry, printed logos, spoken words, and any physical action the prompt asked to preserve. When a shot needs another attempt, adjust the specific reference or constraint in your prompt rather than assuming a blind retry will fix a distorted label.
Check platform disclosure rules before publishing synthetic or hybrid cuts:
- YouTube: Creators must disclose realistic altered or synthetic content—such as a synthetic presenter or a generated scene that resembles a real event—using the altered-content setting in YouTube Studio (YouTube Help).
- TikTok: Posts that show realistic AI-generated people, voices, or scenes must be labeled using TikTok’s AI-generated content toggle or a clear on-screen disclosure (TikTok Support).
- Amazon product listings: Amazon’s video guidelines require sellers to tag video files containing photorealistic synthetic performers with
contains-synthetic-performerin the file’s XMP metadata, and listing videos must omit off-site URLs, time-sensitive discounts, or external calls to action (Amazon Seller Central).
Play the assembled video from beginning to end with the sound on and off. Check captions against the spoken audio, inspect vertical framing so UI overlays do not cover faces or product text, and listen for abrupt cuts or competing background music. Export a short test sample with your intended settings and play the actual file before delivering the campaign master.
Combine recorded and generated material
A recorded camera take gives you the speaker’s real delivery and physical proof that the product works as described. A generated shot gives you a way to illustrate a missing setting or visual metaphor. An avatar provides a repeatable, scripted presenter track when nobody is available to film on camera. Decide which input serves each beat of the video before you start cutting.
For a founder or creator review, start by pulling the spoken explanation and physical product demonstration that carry the argument, then add supporting B-roll only where it clarifies what the speaker is describing. For a scripted presentation, finalize and approve the wording before generating the avatar video so you do not pay to re-render script edits. Keep generated and recorded clips clearly named in My Assets so reviewers know which shots are filmed proof and which are illustrative.
When your starting material is a longer interview or product livestream, our long-video-to-shorts guide covers selecting self-contained vertical passages, and the talking-head editing workflow walks through tightening spoken delivery before adding B-roll.

How to make a UGC video: from brief to finished video
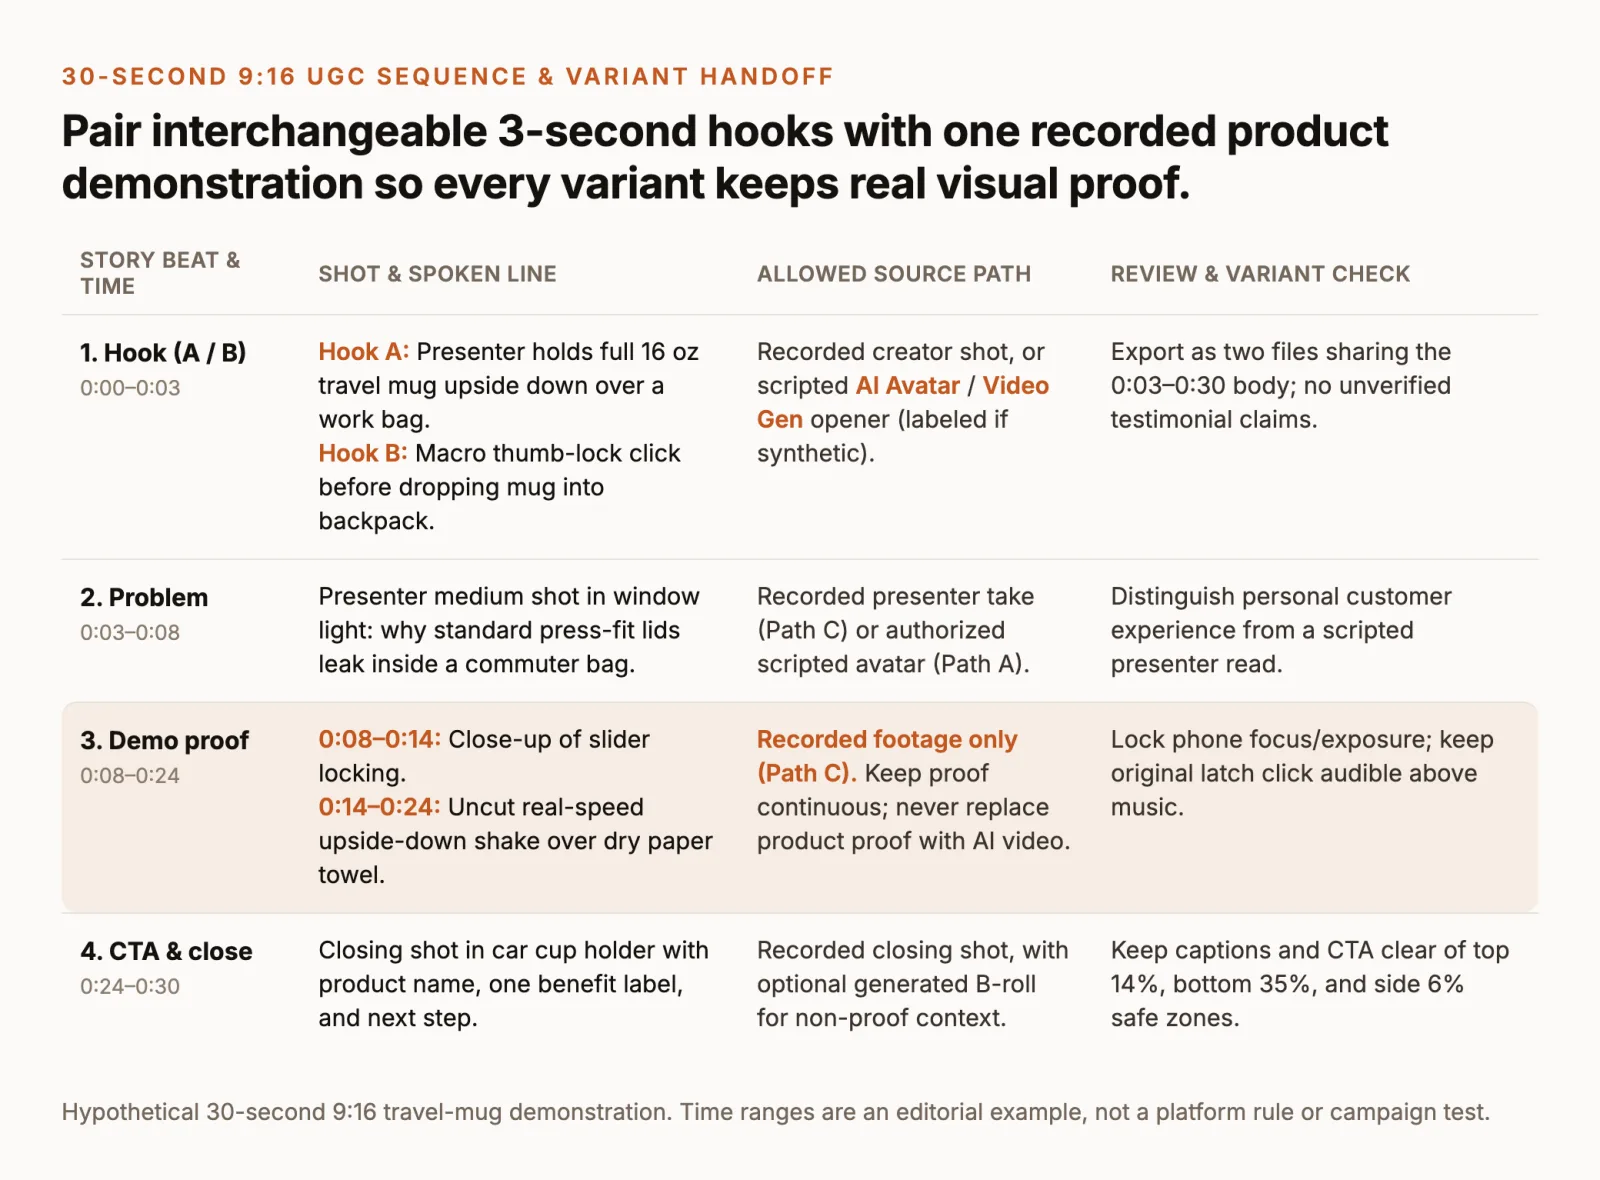
To see how to create UGC videos without mixing up real product proof and synthetic assets, walk through one hypothetical project: a 30-second, 9:16 vertical demonstration for a 16 oz insulated travel mug with a locking lid. This worked example is an editorial template rather than a measured campaign test, and the timings below are a practical starting structure rather than a platform rule.
1. Lock the brief
Write a short brief before filming or generating: define the target audience (daily commuters), placement (9:16 vertical feed), one observable product benefit (a thumb-locking lid that prevents bag spills), the call to action, supplied assets, 30-second duration, and reviewer. State upfront whether the clip reflects actual customer experience or a scripted presenter read so the script and disclosures follow FTC endorsement rules.
2. Write the sequence
Map four beats: hook (0–3 s) → everyday problem (3–8 s) → visible demonstration (8–24 s) → call to action (24–30 s)—an editorial example for a 30-second cut, not a platform rule (Creatify). Prepare two hooks for the same body: Hook A holds the full mug upside down over a work bag (“Would you trust your coffee lid over your laptop?”); Hook B shows a thumb clicking the lid lock shut before dropping the mug into a backpack. ChatCut does not automatically import product URLs into scripts, so bring verified specs or use our video script guide, and avoid invented testimonials.
3. Plan and capture
Capture four shots: a presenter medium shot (3–8 s), a lid close-up (8–14 s), the continuous upside-down shake action (14–24 s), and a closing cup-holder shot (24–30 s). Following Lemonlight’s UGC filming best practices and our product video guide, use a stable phone stand, soft window light, and a quiet room with product details clearly visible. Engage AE/AF Lock on the mug (Apple iPhone camera guide) and lock white balance and frame rate (Apple recording settings). Keep recorded proof separate from illustrative generated shots.
4. Import and assemble
Follow Start Your First Edit and import clips via My Assets → Upload → Files… (or From phone…); AI-panel Upload (+) attachments are single-message context, not reusable project assets. Once transcribed, cut repeated takes without changing speaker meaning (or run the Speech Cleanup Skill) and assemble the four beats:
5. Fill only missing visuals
Use generation only for missing non-proof visuals. For a scripted presenter, select + → AI Avatars (AI Avatars workflow), attach an official or authorized personal avatar, review the confirmation and credit estimate, and inspect the result in My Assets. For a supporting scene, open Video Gen or run a preset Skill such as Hidden-feature product demo, Cozy selfie product review, Quiet creator unboxing, or Before and After, then drag the verified clip onto the timeline:
6. Finish speech and captions
Keep narration intelligible and the latch click audible. The Voice Library offers supplied voices and authorized clones in My Voices (creating a clone and generating narration are separate actions; My Voices narration requires an active paid membership). Use Transcript and Captions or the Add captions Skill to verify product names (16 oz) and timing in the caption Content panel, keeping text out of the top 14%, bottom 35%, and side 6% safe zones (Meta Reels guide; TikTok in-feed specs).
7. Review and deliver
Play the complete edit, verify claims against supplied material, duplicate the timeline to swap Hook A for Hook B on the same 3–30 s body (Influee), and export labeled H.264 MP4 files (mug-ugc-hookA-9x16.mp4, mug-ugc-hookB-9x16.mp4). Play each exported file before delivery (Sell on Amazon accepts up to 1080p; YouTube Shorts blocks Shorts over one minute with an active Content ID claim). ChatCut runs in the web workspace and as a native macOS or Windows app: Desktop local export includes a 4K preset, compatible browsers can also offer 4K locally, and cloud rendering goes up to 1080p (Web vs Desktop Export; Product Facts).
What costs nothing and what uses credits
- Free core editing and export: The Free plan includes manual timeline editing, media uploads, transcription, and standard caption editing, none of which use ChatCut credits. Exporting MP4/WebM video, MP3 audio, SRT subtitles, and Premiere/DaVinci XML also uses no credits; Free web and cloud exports share a cumulative 60-minute account quota, while ChatCut Desktop renders video locally on your computer.
- Editing through Claude Code or Codex: When you control ChatCut from Claude Code or Codex via the plugin or local MCP, the agent’s editing work—cutting, reordering, removing pauses and fillers, placing B-roll, and styling captions—is covered by your existing Claude or ChatGPT subscription and uses no ChatCut credits.
- Paid generation and built-in Agent requests: Messages to the built-in ChatCut Agent use variable credits, and AI video, avatar, image, music, sound-effect, and voiceover generation use credits. AI video generation requires a paid plan. Starting credit allowances may vary by account, so check your account’s current offer, credit balance, and pre-submission estimate when planning a job; see Free and Pro, ChatCut Product Facts, and current pricing.
If you are looking for creator-side advice on building a portfolio, pitching brands, and setting rates (Glowithgia, YouTube), read our separate guide on how to become a UGC creator in 2026.
Questions about UGC video makers
Does ChatCut generate UGC videos, or edit existing footage?
How do I make a UGC video if I only have product photos?
Can I choose an avatar presenter in ChatCut?
Can ChatCut use a cloned voice?
Can I export above 1080p?
Is ChatCut free for this?
How should I compare UGC video makers?
Reviewed on November 7, 2026 using the linked ChatCut product documentation and official platform guidelines. ChatCut publishes this guide. The travel-mug walkthrough and example prompts are editorial templates to adapt to your own material; no new campaign test or comparative performance measurement was recorded for this update.